Photobucket Photobucket Photobucket Photobucket Photobucket Photobucket Photobucket
SPACER

Sunday, November 21, 2010

Heather's fall mantle...

 Heather's Fall Mantle

I guess I best be showing you my fall mantle. Being that I almost have to switch it out for Christmas. I am just behind on life over here, give a girl a break!


What I like is the fact that I didn't change much from spring (I never got to summer), just switched out a few things. I really didn't want to start from scratch, and my daughter really wanted to do it. We knocked it out in like 20  minutes.


I love how it turned out. Just nice and simple. I think I like it better than last years...


Have a happy Thanksgiving this week! 

Tuesday, November 16, 2010

A Turkey Tutorial

If you are visiting from Sew Much Ado, welcome!  Stay a while!

Do you all know the fabulous Abby of Sew Much Ado?  Well...you should :)  Last week she had a Copycat Challenge where readers submitted their copycat work in three categories, accessories, home decor and clothing.  Right now they are voting on the finalists, so you can check out the best and vote for yourself.

Abby asked Heather and I if we would be guest bloggers during this challenge.  Um...YES!  I set out to make a home decor copycat, and here's what I came up with!

First, the inspiration:
these darling headbands from Pottery Barn Kids

...and although I thought for 12 seconds of making these for my boys, I decided on something that would get a little more use...

My interpretation:

I just am loving embroidery hoop art lately

Want to know how to make this also?
Okay.

The tutorial is just below, but I wanted to introduce you to Little Christmas House.


The pattern for this little cutie is available in our shop, you could also purchase a kit!

Embroidery Hoop Turkey Art Tutorial

Materials:
  • 9 inch embroidery hoop
  • Muslin (enough for a 11" circle)
  • Fusible web (like Heat n Bond)
  • 10 or so felt varieties
  • matching embroidery floss
  • needle
Step 1: Using the embroidery hoop as your guide, cut about an 11' circle from your muslin.
*Note: works best with a Dora pencil


Step 2: Using this pattern, trace each piece individually onto the paper side of the fusible web.  (For the feathers make sure to go a little longer "into" the turkey body).  Cut roughly around each piece, lay the shiny side paper onto the back of each felt piece and iron.  TAKE YOUR TIME.  Start out with a low heat and have another fabric in between the iron and the felt.  Some felt could burn and be altered through ironing. **Be wise and refer to the directions on your fusible web packaging**

Step 3: Peel the paper off of the felt.  This should leave a nice shine on the back of the felt.  Using the same method for ironing felt as in step 2, place all of your pieces onto your circle of muslin, and iron into place.

Step 4: You're ready to stitch.  But first we need to separate your embroidery floss.  Embroidery floss has 6 strands of thread in each piece.  I used only 3 strands for stitching everything except I only used 2 strands to stitch the words.

Step 5: Stitch!  I used a back stitch for everything.


Step 6:  I used a little trick for the words.  I tried to use a pencil to trace the words onto the felt but it would not work.  What I ended up doing was traced the words onto wax paper, pinned it into place on the banner and stitched through the wax paper onto the felt/muslin.  It worked fabulously.


Step 7: Pull the muslin on all sides to tighten the fabric.  Once in place, trim sides to about 1". 


Step 8: Hot glue the edge to the inside of the hoop.


TA-DA!


Thanks for stopping by!
Happy Thanksgiving!

Thursday, October 28, 2010

Megan's Quilt Finish

Hi to everyone new who may be visiting our blog...welcome and take a look around! :) Friday is a few short hours away and it's the start of Blogger's Quilt Festival from Amy's Creative Side. My sister Heather and I have been anxiously awaiting this event for a while and we hope you like our quilts!

A while back I purchased some of Joel Dewberry's fabric line Deer Valley. I wanted to re-do my bedroom in aqua's and gray's with a little bit of orange in there. It took me a long time to decide what kind of quilt I wanted for the end of my bed...so I used some traditional piecing and a modern layout, and I present my quilt
And my pieced back (I just can't resist piecing the backs these days!)
Scrappy binding just fit perfect with this quilt and all the colors.

A closer look at the blocks.

Well I had a list of things I still had left to do.
Among them, a cute pieced blanket for the end of my bed :)
And I've decided to sell this quilt pattern!

For the next week starting NOW thru Thursday November 4th Heather and I are putting all of our patterns on SALE.
That's right.
click on the image to head straight to our shop!
You don't have to read that twice, buy one get one FREE.
Okay you can read it again, it's a cute image afterall.
So please head on over to our Etsy shop and take a look around.
While you're at it, you can pre-order Gaggle of Geese!
Just sayin'.

Don't forget to see my sister Heather's quilt finish!

Amy's Creative Side - Blogger's Quilt Festival

Tuesday, October 19, 2010

NURSERY REVEAL FINALLY!!!

Okay, he is only 15 months old,
 but his nursery is finally finished...
let Little Dude take you on a personal tour...


These were an easy fix. Just bought Ikea white panels, and added the cute Amy Butler fabric to the bottoms. I plan to add a tutorial to the blog. Super easy...


My Husband did the board and batten (is that how you say it?) Walls. Well, he did the woodwork. I did all the painting and caulking. NOT FUN! However, I am in LOVE with how it turned out. I want it all over my house. But easily over 20 hours on that project alone...


Seriously! How cute is he sitting up there? There is the cute elephant painting my Mommy dear made for him. Also the quilts are from me and my aunt. I don't have all his baby quilts here. There are 5 of them. (If you count Megan's. And should we? I mean she still hasn't finished it!)

My Father in law built me this book case years ago for my girls. I repainted in this pale aqua. I need to give my Mom a little time to get her life back in order from her vacation, then I plan on putting her to work. I want gray fabric liners for the baskets. Pretty please Mama?

I found this vintage window frame at a little craft fair about 5 years ago. It has never looked so cute! I put some cute Rylee Blake fabric to back it, and I love how it turned out. Then I just added some little cup hooks to hang his hats. Cute?

I found this little shadow box at TJMaxx. It is so hit an miss there, but sometimes  you can find the perfect little gems. Inside are the hats I knit for him when he was a newborn. Heart pang...sparkly tears...  We want to freeze him in time and it isn't working!


My Mother in law made me the CUTEST baby blessing sailor outfit ever! It fit him for the 2 seconds he was blessed, then off it went. How were we to know he would be so huge? But I knew it would make for darling decor. The dandelions are made with vinyl on one of those cricuts I don't have but want desperately! I had a super nice friend make them for me :) 

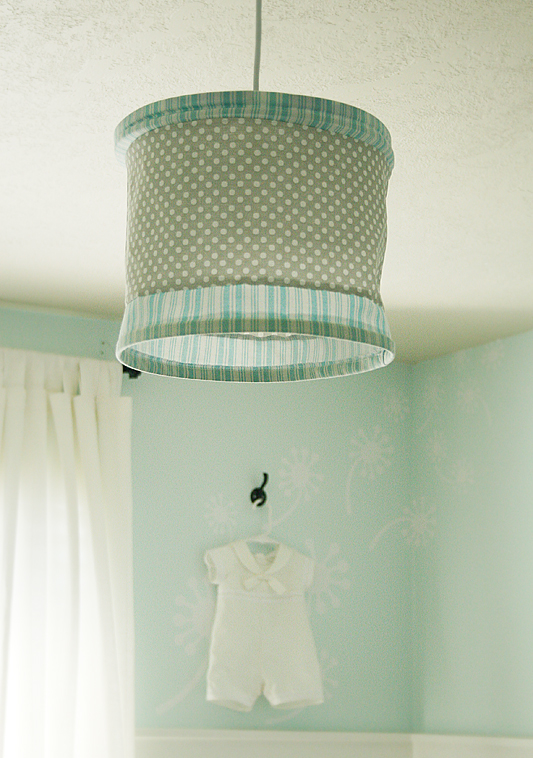
I have a tutorial for this too. This cute fabric chandelier. It is from Ikea. I just remade the shade. Super easy, super custom, super cheap! ($13 bucks)


These frames above his bed are from Ikea too.  I took the photos inside. He was only 2 weeks old...man what is this salty discharge coming from my eyes???


The bedding I made with my Mother in Law. She is the best to craft with. I just cute and measure and she sews like a crazy woman in a labor camp. I let her have breaks occasionally, but not much. We had fun making them together. We didn't finish, so  naturally I send the crib skirt fabric back with her with detailed instructions and a deadline of when I would like it shipped back. She was several days early!


The children cracked me up goofing around in the corner (especially Sophie's face).

Okay, now that this post took me as long to complete as the room did...I am OFFICIALLY finished with his room and ready to move to another.

I am so happy with how this turned out. I kind of want to kick him out and move in myself. I had such a hard time with a boys room. No flowers or pink or ruffles. It took me a while to work it out in my head. 

What I love the most is that almost everything in that room is made by me or someone in my family. It is totally unique and custom.  The only problem with going this route, is that your baby may be 15 months old before it is complete.

I hope you all love it as much as me. Linking to these parties...

The End

Thursday, October 14, 2010

Spooky Runner

I am having so much fun this year increasing my Halloween items...next year will be so fun when I open up my box and remember it all again.  (Isn't that the best?!)

A few of weeks ago Heather and I got a grab bag from Material Girl's Quilts in Utah.  We were gid. dy. (yes two words) when we saw that there was not only Halloween fabric involved but Boo to You by Riley Blake.

Of  course we knew we had to make a runner. 
 We both made a brick pattern.  I have a large brick pattern going across the middle of the runner.  On each side I have a smaller brick pattern running in the opposite direction.  I believe my larger rectangles are 5 x 8 and the smaller are 2 x 5.

And a scrappy binding.  My new fave.

Heather and I each made one right?  Well she sent me a picture of her finished runner via text and I noticed that she had enough fabric to make a good size runner using only the larger rectangles.

Hmmm.

We supposedly split the fabric.

Who cut it you ask?

Do I have to answer?

Monday, October 4, 2010

The last teaser I promise...

This is the last sneak peak of the nursery before the big reveal. This whole room has taken way too long. And sometimes I need to go to the store and just buy something instead of having to make everything. It is super cute, and super custom and I can't wait to show it off...

I am trying to paint the book shelf, it I do get it done, or I don't get it done, I will post it next monday promise.

I think everyone will like it. It makes my heart skip a beat each time I walk by...

Tuesday, September 28, 2010

Halloween mantel on a budget!!

I finished my mantel and it came together in probably 15 minutes...I was a happy little camper to say the least!  AND I probably spent $10 total.  (Some things I had from before.)  So here is what I spent and some little tips I've got, hopefully you can find something useful!
Halloween buckets stacked on top of each other: $1 each Target 1 spot.
Glittery haunted house: $3 Kirkland Home (are these anywhere else other than AZ?? Love it!)
Glitter skull: Dollar Tree, $1 :)
Black birdie: Present from my mommy
Old medical book: Free from my honey's school!
Black crow: Dollar Tree, $1
Skulls in apothecary jar: Dollar Tree, $1
Candy Corn in Walmart glass: Probably $2 for candy and $1 for the glass

Tip: REPURPOSE!  For 30 days you can mess up some of your other decor to make your mantel, table, etc. adorable!  The candle stick I spray painted and it is usually in my kitchen, I paid $3 for it originally.  The apothecary jar is usually in my bedroom with seashells.  I also tied some leftover fabric strips around the top of the lid.  And I left my little boys in the frame up...they aren't too spooky but I thought the gray frame still worked fine!
Spider: Dollar Tree, $1
Cute banner: From Ms SewSara herself
(there are so many tutes out there on how to make one of these cuties, so fast!)
Spider/web: Also from Ms SewSara!
There you have it!  My Halloween Mantel on a Budget!

What are your holiday decor on a budget tips?
PS Don't forget to check out these great linky parties, including Get Your Craft On!

Friday, September 24, 2010

Boo!

I want to make lots of monster creatures.
I made this little guy for our mom, and I guess I kinda invented him. He's crocheted, and I used this free ball pattern for his body alternating colors every four rows. His arms started with a chain four and increased to eight I believe for probably 5 inches. His eyes, mouth and ears are all made of felt and stitched onto his face. I was happy with this quirky little guy!
Our mom loves to host a Halloween party with loads of grandchildren. So I wanted to add to her cute decorations, and I love me a banner.

Using a cardboard template and rotary cutter I got my perfect triangles and sewed them to a ribbon. Using fusible web I traced the letters and ironed them accordingly. A good tip: If you aren't the best with your applique skills (me) it's awesome to use invisible thread. I think colored thread can make more of a statement, but until I can sew straight better, I'm sticking with invisible thread.


And there you go! Happy Halloween everybody, can't wait to check out all the goodies and eat a few too.

Let me know if you need any more specifics!
PS This was a re-post from last year, however it's probably new to you, right??? :)

Tuesday, September 21, 2010

Fabric Bracelets

I recently got back from a 2 week vacation back to my "home".  I had to leave my love here and got to go stay at my parents with my two little rascals. 

We had a blast.
We missed the man.
I spent many a craft night, afternoon and a weekend with my dear sister Heather.
Miss you.

About an hour after I left she sent me a text of a picture of her giant crying eyeball.  Sad.

Earlier this summer I was flipping through a catalog of a fabulous designer.  I wanted to cover myself head to toe with fabric I love it so much.  If it were socially acceptable I'd drape myself in fabric. (Seinfeld anyone!? :)

Immediately I got out my scrap fabric and started on a bracelet I designed in my head.
We are very impulsive.
Heather has paused a movie, ran to her bathroom and cut bangs to match the actress. No lie.

This is what I came up with.


Since this summer I've been debating about offering a tutorial on how to make these or selling them or both.


They are made with scrap fabrics into small yo-yos and then glued to a thin elastic piece.  They are simple, but take a decent amount of time.

I quite like mine and wear it often.  It gets me that much closer to my ultimate goal of being covered in darling fabric. :)

What do you think?

PS If you are interested in purchasing one, contact us at freshpoppydesign{at}gmail{dot}com!

And check here to see the wonderful parties we're linking up to!