


We've been MIA, once again. Have you been to our QuiltStory blog? We've been so excited, we've been working hard on it all week. Whether you make quilts or just admire, go check them out. And let me say, these aren't your grandma's quilts, these are vibrant darling quilts that I'd love to have in my own home!!
my aplologies to grandma's and grandma quilt likers :)
Plus in the morning we'll be featuring my fabulous friend Sara and I'd love to see her get many comments!!
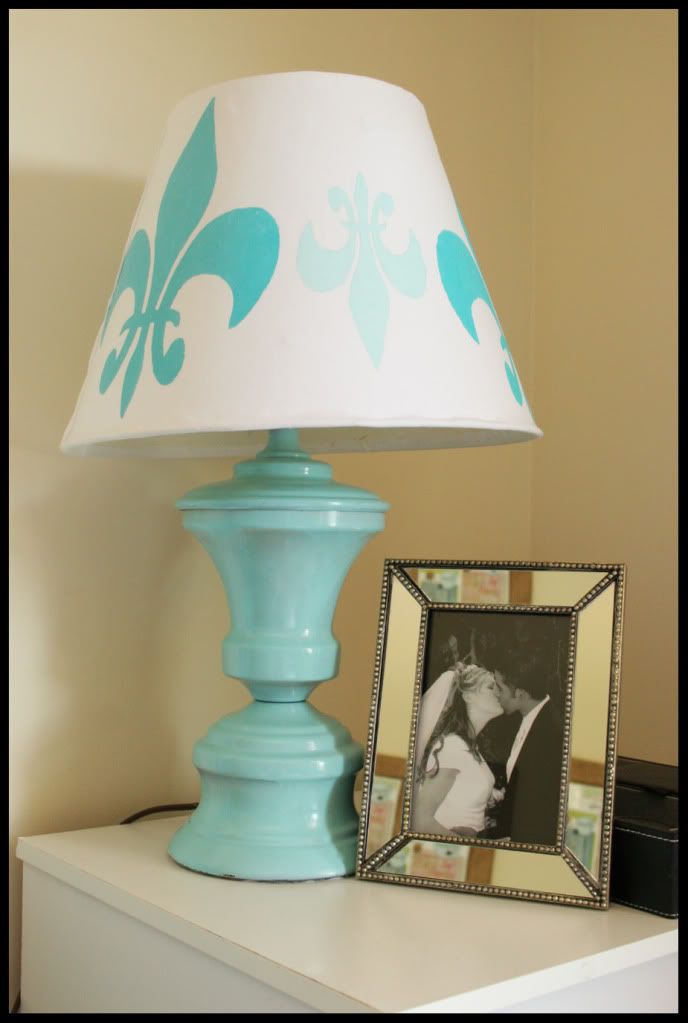
I've been meaning to post this for a bit. My lovely friend Sara gave me her lamps when she moved. ...this really isn't a before picture...see they used to be brass lamps and she made the first great leap by spray painting the bases. I LOVE the color, so I decided I wanted to cover the lamp shades with new fabric, and here's how I did it.

Let me apologize for the awful photos. With two babies, I do most my crafting at night, thus ugly pictures.
I really wanted to get a white based fabric with some maybe a little aqua design to cover the shades with. Shockingly I was unable to find such a fabric at Walmart or the local quilt shop. I decided to make my own by stenciling. More on that in a minute.
1. Roll your shade along the wrong side of your fabric tracing the top and then the bottom with a pencil.
2. Cut about 1/2 inch larger than your pencil line on the top and bottom.

This is how I made my own design. Do you know about Freezer Paper? It's awesome and can be used in many ways. It can be purchased at most grocery stores. There is a paper and shiny side.
3. On the paper side trace your image and cut out.
4. IRON the shiny side to the right side of your fabric and sponge paint into the stencil! You can make whatever image you want, and the paint won't bleed through the sides. ALSO, you can reuse the stencils over and over, it irons on and peels off easy peasy.

5. Trickiest part. Using Aleene's Tacky Spray adhere the fabric to the shade. It's sticky and this took some trial and error.
6. Hot glue your edges by folding into the shade. Add a trim if you'd like!

Ta-da!

When I move to Arizona (we're counting down the days!) I'd like to find the perfect trim for the top and bottom. I'm pleased how they turned out, definitely a statement!


11 comments:
Cute lamp shade! Thanks for sharing. BTW, if you are moving to the Phoenix area let me know and maybe we can meet. I'll let you know about some of my favorite bargain shopping places.
Nice job, Meg!
Now I want to find a TRUE before pic of that lamp ... I'll see if I can.
Thanks for the shout-outs. It never gets old, that's for sure! :)
I love the fleur de lis stencil. Makes it look so unique and matches your room perfect.!! Very creative.
Bless my heart, I need to read that stencil and freezer paper part over again...who knew? Super cute!
me too heather -- i've never tried the freezer paper!
Turned out great! I love fleur de lis.
It looks fantastic! I love the colour!
Your lamp is so fun but I am excited about the freezer paper idea. I did not know about that. Thanks so much for the idea. My mind is taking it and running. :)
Pam
Nice job! That lamp looks frugally fantastic! I love freezer paper too. I even use it to pass fabric through my printer.
Anne
It's Pam again. Just wanted to say thanks for considering a Memory Walk. Most of them take place in the early fall. It is a lot of fun and for a great cause. Have a fun weekend.
Pam
Love it! That turned out so great!
Post a Comment