Photobucket Photobucket Photobucket Photobucket Photobucket Photobucket Photobucket
SPACER

Tuesday, March 30, 2010

Easter egg craft project...

Repost from 2009
Easter Craft

How cute are these? There are tutorials on a few sites, but I liked this technique at this site...super easy, and cute.
You will only need cute scrapbook papers, probably lightweight, mod-podge, and glitter. I glued little paper flowers and rhinestones to cute them up a little more...

Plus these are great crafts for kids (not too young, pretty messy) probably 6 & up. My girls had fun making them. Hope you like them, and Happy Easter! Check out This is the year for other mod podge projects!

Saturday, March 27, 2010

Easter tree...

I made a cute easter tree. After I found these small sparkly hanging easter eggs at Roberts, I knew I needed a cute tree. All ya'll need to do is go and clip some branches. These worked great because they had buds on them, and the buds are perfect to hang the eggs from.
Of course my 2 year old loves to redecorate it and put everysingle egg off of one branch. It is funny and I just let her do it and then a day or so later, rearrange it again.
I just got a cute terra cotta pot from Roberts. It came all aged looking. Then I put in floral foam. Stab in your branches randomly and add the eggs. Put some cute moss on the foam. Easy Peasy.

Then plop in on your cute spring runner and you have a cute easter spring display! Linking @ a soft place to land and Today's Creative Blog.

Thursday, March 25, 2010

Spring quilted runner....

I found this cute little bunny friend leftover on clearance last year. I love him! I guess it is a her because of the pink and the cuteness!
My Mommy, Meg and I made some cute spring runners last year. We went and bought a cute fabric line (I am not sure who it is now, I think MODA) And we just invented and played. I planned on making one for each season, but this is as far as I got.
Super pretty spring colors!
We did just a raw edge applique and doubled up the flowers. Then we did that chenille strip that frays when you wash it, for the middle of the flower.
I hope you like it. These are my favorite colors of all, soft light spring pale pastels. Now if spring would ever STAY here!!!Linking @ a soft place to land. and Today's Creative Blog.

Monday, March 22, 2010

Mini Makeover REVEALED!

Emphasis on the mini.

You see, we're moving in a couple of months...and my baby has been sleeping in an office with a crib. I finally decided I wanted to make a few little things to make it his own room. When I was debating whether to do it in my head, I realized I decorate for Christmas, Valentines, and all these things that are just weeks, so I could definitely do this!

I started with the idea for artwork, three cars/trucks:
I decided to get canvas from Walmart...it was about $7 for all three, I painted around the border since my walls are already white, and mod podged the cars on. I used inspirations from Pottery Barn to create the cars and traced it onto scrapbook paper.
The one below was intended as a police car, and I used the yellow just for color. But once I put the siren on I realized it kinda looks like a cab! Either one works though.
So here is the bedding and pillows which I did make all of them, but not recently. If you've been following our blog for a while, I showed off my older son Sawyer's room a bit ago here...see I am one of "those" moms. Before I had kids I vowed I would never be walking around with two babies (that weren't twins). Well guess what? I did it. My boys are 18 months apart and so Sawyer moved into the toddler bed and Oliver moved right into the crib!
And this old clock, I had a post about this here.
And this corner is just in case he forgets his name. Wow! That's what happens when you make crafts at different times with no plan of where they'll go. I also mod podged over that shelf, we had it sitting around with no use and it was too old to return, it worked perfect!

Here is where told how I made the memory tin that reads "Oliver" and here you can learn to make the name blocks too!
Consider it revealed! It looks so much nicer than before. Promise. And no, you don't see the other wall because it's a desk :) I think when we move I'm going to hang the artwork with ribbon on some bright orange knobs, would that be cute?

Friday, March 19, 2010

Mini Makeover Part 2 & a tutorial

Part two of mini makeover: I've seen these cute little blockies around and just had to make some for my Oliver.
Wanna make some to?

Here's how to make adorable lettered fabric blocks for your baby.
You'll need:
  • Six 3.5" squares of fabric per letter (36 for me)
  • Heat n Bond
  • Scrap fabric for letters
  • Letters traced or printed from your computer
  • Batting
1- Trace your letter onto Heat n Bond and cut out roughly around the letter (remember to do the letter in reverse).
2- Cut out six 3.5" squares for each block you want to make.
3-Following the directions on the Heat n Bond packaging, iron each letter onto one square.
4- Sew around each letter.
5- Sew 4 squares sides to sides together.
6- Pinning the top and bottom squares to the ends of the "coming together" block, make sure to match the corners and then sew around. This can be tricky, it kind of takes trial and error to learn how far to go to on the corners.
7- Leave a small opening to turn your block right side out with, and then stuff it with batting. Hand sew the hole closed.
If you wanted a crisper more square look to your blocks, I bet if you added some interfacing to each square it would give you that effect. I wanted a softer more playable look for these.

There you go! Now you have some cutie-patootie soft blocks for your baby.

How lucky am I that OLIVER is six letters? As always, let us know if you have any questions!

Partying with AmyLouWho and My Romantic Home.

Saturday, March 13, 2010

I made new living room Pillows

So a few weeks back my older sister and I snuck into my parents house while they were vacationing in Hawaii. (sorry Megan, and sorry Mom for that matter). We decided to have a last minute craft weekend. I made these pillows. We didn't only craft, we went out to eat and saw a triple feature! My ideal weekend!!!

Anyhow, I was hating these old pillows here, and I have wanted to spruce up the living room without alot of time or money spent. Luckily I have neutral main furniture so I can switch things out every couple years. I still liked the window treatments so I wanted to match with that. This was a mitered pillow. I just google searched how to mitered pillow and found tons of links. I put zippers into these also.
The large pillows are really simple. No trim or anything. I fell in LOVE with the fabric so I thought that was enough. I think I wish a little that I put of a ruffle or pom poms. But I knew if I complicated it to much I wouldn't get them done for months. Check out the dresser and hutch here. It matches nicely. I will show pics of the whole room once I get the coffee table refinished.

Linking to AMYLOUWHO!, and My Romantic Home.

Monday, March 8, 2010

$270 dresser and hutch makeover!!!!

Okay, remember my dresser from my living room? It was perfectly cute and I got it at the furniture outlet for $150. (normally $600) I was happy with it for a while, but I wanted a hutch really bad. So I got the one you see on the left. It happened to match color perfectly, it wasn't made to be a set. I found the top at the same outlet center, about 3 years after the dresser. I was so excited!! And it retailed for $900. It was marked $150. I put aside all self respect, and asked for 20% more off, and he said yes! So I got it for $120. We hauled it in the house, and propped it on top of the dresser, and it sat like this with a bunch of crap on it for like 2 months!!! And it is the first thing you see when you walk into my home!!! SICK!

So I wanted a pretty fabric backing on the hutch. But I didn't want to commit to wall paper. So I got foam board, measured out the openings, and went to town. First measure, then Cut and split the foam board.

1) Tape foam board together if it isn't long enough. Use white tape, or it may show through.
2) I used thin quilt batting to soften out the board.
3) I used spray adhesive spray the batting to the board.
4) Smooth and trim off excess.


1) Using a rotary cutter and guide, cut fabric 1" bigger around edges.
2) Iron alot and make sure every wrinkle is out.
3) Tape the back holding really tight.

If you are an utter moron like me, and think that 23 plus 23 equals 56, you may need to use a calculator! Or have to start over like me!!! (and have to go out and buy more foam board, and fabric)

Get your dear sweet handsome husband to hook you up with some new trim on the no trim drawers on the hutch part...

Shop the house, hobby lobby, and ross for some accessories...

I did something TOTALLY original and like nothing you have seen in blogland, I decorated with white ceramics, and birds and their nests...I know, I am a trend setter!
Ross was the BEST resource for most of these white ceramics, and the most expensive item was $5.99. The white dishes with the cut outs were from hobby lobby a few months ago. Most expensive item $11.99.
LIGHTS Off....


LIGHTS On


Final product!!! I am so pleased and proud of this peice of furniture. I think I could sell it in 10 years and get my money back. I hope you like how it turned out!

the shabby chic cottagesomewhat simple, amylouwho, finding fabulous, furniture friday,

feature yourself friday,


Thursday, March 4, 2010

Mini Makeover Part 1 & . . .

We are moving in a few months, but I can't stand that my baby's room is an office with a crib in it. So I am doing a mini-makeover, complete with a little wall art, a mod podge shelf and re-doing an old clock.

I think I got this clock from my mom. Sorry momma, hope it wasn't a treasure of some sort.

It's oak around the outside with a gold rim. I know, it screams baby.

PS I know babies can't tell time, but I actually use this a lot, it's the perfect line of sight in my hallway.
And... 
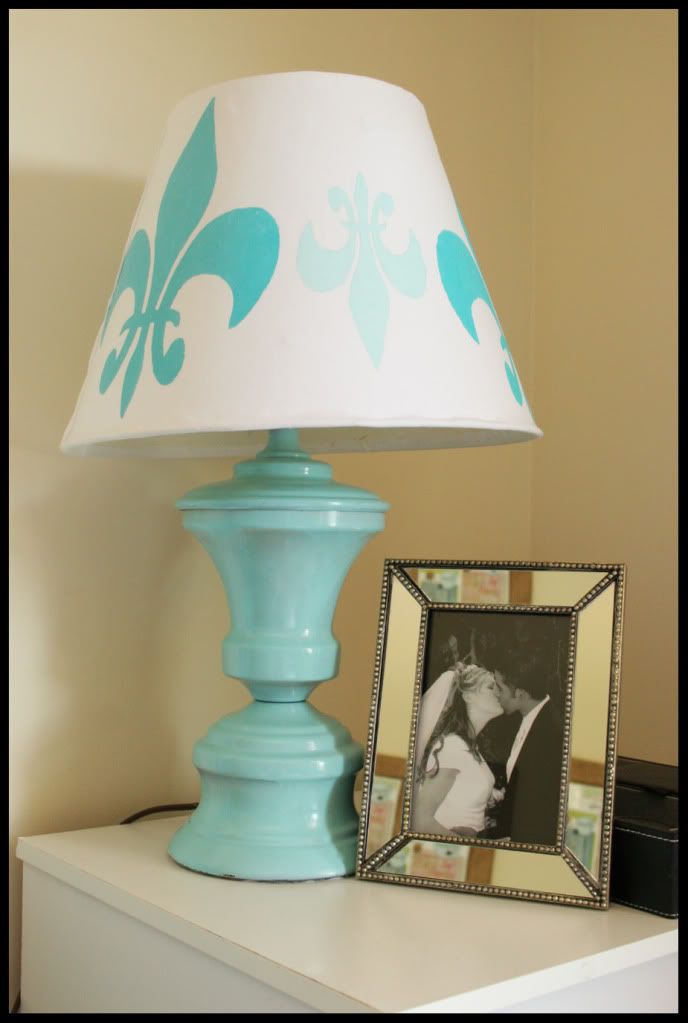
I actually kinda love it. I took it all apart and painted the outside and the rim. Then I mod podged a simple car in the middle, which is going to match my artwork.

Part two coming in a few days!


ALSO THERE'S A GIVEAWAY!!!

There's a great site that is hosting a giveaway of our patterns. All you have to do it go the the Quilt Qua site and leave a comment on which TWO of our patterns you'd like to win!

If you're a beginner, I'd suggest Sweet Tweet and Crazy Daisy.
If you've had a little more practice check out Serenity Now, Tutu Pretty and Snakes, Snail & Wiener Dog Tails.

So please go sign up to win some of our patterns! We'd love to get lots of comments, and who knows maybe we'll have another pattern giveaway soon *wink, wink*