Photobucket Photobucket Photobucket Photobucket Photobucket Photobucket Photobucket
SPACER

Monday, June 28, 2010

I finished! Quilt top...

I finished the quilt top. I took my little fifteen minute breaks I talked about here and they added up to this. Now I did have to stay up late 2 evenings to focus on it for a couple hours and finishing up. I can't just leave my pieces out on the floor overnight due to the tiny humans walking around my house...but here you have it.
I hade to remake a couple pink blocks due to the lack on contrast between the sashing. And I ended up getting that burnt orange post fabric because what I had picked out originally would definitely have not worked because they were purple.  But I am super happy with how it all turned out.


I have it off to my fabulous aunt to do the machine quilting. She does such a good job, and she gives me a discount. :) thanks Wendy. And everything she does is custom. If you want her email, contact us.


Plus my purdy roses were in bloom and it was the perfect backdrop for the quilt top.

So I should be getting it back soon and I will post the final project.

linking at amylouwho

Wednesday, June 23, 2010

Singed flower headband tutorial...

Singed Flower Tutorial...


Hi folks, today we are going to learn how to make singed flower hair clips or headbands. I didn't invent these, I have been seeing them around blog land lately, but I will show you what I know, and add in some tulle (which I haven't seen yet...)

Supplies needed:
Scissors
Synthetic silk fabric (don't get the real thing, I tried, doesn't work) anything synthetic is fine.
tulle
matches
beads
headband, or hair clampy clip thingy.
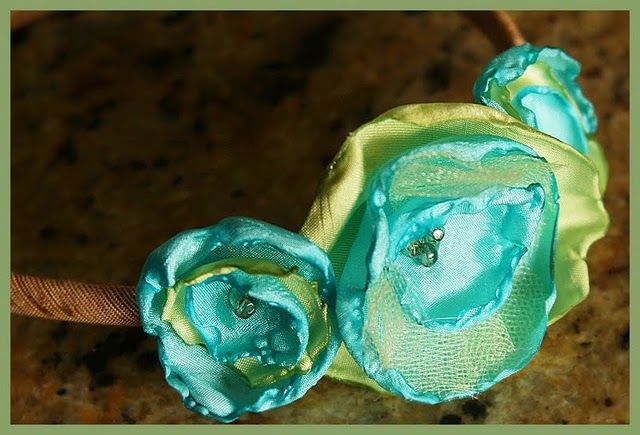
Don't get perfect here. Just cut three circles each smaller than the other. My largest here is probably 4 inches. But you can play around with this. These do not have to be perfect circles.

Okay, this was a little hard taking a pic. But all you do is light a match and move it around the edges of the flower. You mostly want the heat on the fabric, not the flame or it may burn and get black. Which is fine for some colors, but not alot.  You will see the fabric start to melt and bend and pucker. Do this to all three...

Next cut 3-4 2 inch squares of tulle. (don't break out a ruler or anything, just eyeball it)
Fold the tulle in half, then in half again.

Then round it off with scissors...


Now if you have any miniature humans around you begging for food, you may have to make a grilled cheese in the middle... You can see I started to hot glue my layers.


Just put a blob of hot gule in the center, add a layer, etc. Then at the top, do a big blog and add 3 beeds.  Some folks are more of perfectionists than I am, in that case, you can do this with a needle and thread.

Hot glue to the head band. And I don't think I need to say this, but please offset the flower. We don't want people walking around with a flower on the tip top of their head..

Ta Da! You are done!


Now sit back and admire them on your head, or in this case your cute daughter's head...
Now look at your cute flower headband....

Now look at  your mess....

Now look again at your flowers...

Now the mess...

Was it worth it????? What do you think???

linking up to amylouwho

Thursday, June 17, 2010

Starting a new quilt!

Okay, Megan and I are Sucky McSuckerson's. We try to act like we are these big quilters, but then we crank out a quilt about every 6 months each. Pathetic (said with an english accent, because we are half brits). So I decided I am going to take advantage of the little tiny 15 minutes I get here and there. This week has been crazy, I have all 5 kids home, 3 birthdays, summer camps, piano, gymnastics, dance etc. But I get little breaks here and there. (In fact, I wish I were using this little break that I am spending blogging to you folks, sewing...lol)....

My oldest daughters favorite color since she could speak is purple. She LOVES it! I finally gave in and bought the paint (the second one in the sample) when Lowes was having a sale. We haven't painted yet, but I am making this throw for the bottom of the bed. I love this fabric line. It is a "little house" print by Annette Tatum. Super pretty. So I will finally be a nice Mom and let her do the purple thing.

So I cut away. Then I pin and press while I am watching TV with my husband. I come and sew whenever I have a little pile ready to go. Mostly I only need 10 or fifteen minutes to sew the little piles then press later. It is actually working out great! I am quite impressed with how much I have finished in a week's time. I really try to wait for 3-4 hour blocks, or craft weekends, but I think this is how I am going to have to craft.

I am lucky in that I have a craft room right off my kitchen. I promise to share pics one day, but there is always the last things that never seem to get done (in my world.) And it is always too messy from crafting or stashing my crafts purchases, that it wouldn't look nice in a pic. I am going to reveal it soon...bless my heart!
Here are a few of the finished blocks. I am hopefully going to be piecing the whole thing together within the next week so hopefully I will reveal the finished quilt top in a week. Wish me luck.  And good luck to all you other Mom's that only get 15 minute craft increments. I feel your pain!

Going to link to some of these parties...

Monday, June 14, 2010

My Spring Mantle...

My spring mantle. And yes, it is barely spring here in Utah. Our winter just ended a week ago (cross your fingers for no more snow.)  I figure I can leave this mantle up for a couple more months and skip summer mantle all together! 
Anyhow, I have the rock wall behind my mantle. I feel like the accessories compete with it. I rather like all the white dishes against it, they stand out a lot. I filled the glass apothecary jars with eggs and twigs. I really like the colors, so I pulled from the egg colors for my other accessories.
I also love the cement bunny at the end. It was only $5.99 at Ross before Easter!
Found another cute ceramic teapot at Ross, $6. And my mom found that cute candle stick at TJMaxx, just had to buy it for me. (I love it when she has that urge!)


And another photo of fatty fat head on the spray painted ceramic cake stand. Makes me happy!
Going to link to some of these parties...

Wednesday, June 9, 2010

I'm Dreaming AND a reveal...

It's official.  I am moving 1,400 miles away.  Whoa.  I have 10 days.

I recently made over my bedroom...although there are a few things I'd like to still do with it.  So,
today I was dreaming of all the things I could add to my new room once we arrive in Arizona.  See, I'm moving from what could be compared to a really crappy place to a really nice place.  I've got hardwood floors throughout.  Which means a lot of rugs.  And I'm finally ready for my room to be DONE!

For starters, I'd like this vanity for my room.

Wouldn't I look adorable in that chair working on my blogs?  (I would.)

Then I'd like this chair to be sitting in an opposite corner:
That's where my husband would sit and look adorable reading medical books...zzzzzz...

And for our feet, I've been swooning over so many amazing rugs, this is what I want to be the last thing my feet touch before I snooze:

New rugs by Ms. Amy Butler...there were sooo many cute ones I just couldn't decide.

So you want to see what this all matches??

My Kinda Bedroom Reveal.
BEFORE:
This .jpg is titled shame.  This was at the start of my re-do.

PS Did I mention I did this in about 2 1/2 days??  I was crazy and decided to surprise my husband.  I started on Friday and he came home Sunday afternoon.

AFTER:
My fabric inspiration was Joel Dewberry's Deer Valley.
Call me a dumbo-head.  I have all these mirrored frames (to help with my accent color gray) and I didn't think about all the reflection possibilities.  I'm gonna work on that in my new place.
Imagine this:

  • slate gray duvet cover and matching shams behind my accent pillows

  • headboard raised a little

  • pieced quilt laid across the bottom with all my colors

  • an Amy Butler rug on my hardwood floors
that's the plan...
I showed in a tutorial here just exactly how I made those lamps.

And here I talked about re-making this memo board.

What did I do?
Here's the checklist:
spray painted headboard
stenciled and covered lamps
spray painted and stenciled memo board
spray painted a mirror and shadow box with my wedding bouquet inside (not pictured)
made 3 easy (no trim, just slip in the back) accent pillows
filled existing frames with photos
the pictures above the headboard are from our favorite vacation so far...the royal mile in Edinburgh Scotland on the left and Canterbury Cathedral in England on the right


Any tips?  Never share a half-finished project as a reveal in blog land.  It's in bad taste.  :)

PS We love to party, so check out our linky parties because we're linking up!

Monday, June 7, 2010

Before and after Cake Stand...


Seriously, I apologize if this cake stand made you throw up in your mouth a little bit.  WHich is exactly what happend to me when I saw it on the clearance rack at TJ Maxx. I almost missed it's potential.  I have been looking for a cake stand, not for cake (not that I have anything against cake...my butt could tell you that...) but for decor. They are not cheap! And since I consider myself to be thrifty, I couldn't just fork out $50 bucks for one.  Anywho, with some white all purpose spray paint.... drumroll please...

Pretty huh! Now that your nausea should have settled I hope you enjoy.  She had a pretty shape with the ruffled edge. I just topped her with a big fatty fat head bird, and a candle with a strip of raw edge fabric that matched my spring mantle...I will post the rest of the mantle in a couple of days...

Hope you liked!

Going to link to some of these parties...

Thursday, June 3, 2010

Cover that shade!

We've been MIA, once again.  Have you been to our QuiltStory blog?  We've been so excited, we've been working hard on it all week.  Whether you make quilts or just admire, go check them out.  And let me say, these aren't your grandma's quilts, these are vibrant darling quilts that I'd love to have in my own home!! 
my aplologies to grandma's and grandma quilt likers :)

Plus in the morning we'll be featuring my fabulous friend Sara and I'd love to see her get many comments!!

I've been meaning to post this for a bit.  My lovely friend Sara gave me her lamps when she moved.  ...this really isn't a before picture...see they used to be brass lamps and she made the first great leap by spray painting the bases.  I LOVE the color, so I decided I wanted to cover the lamp shades with new fabric, and here's how I did it.


Let me apologize for the awful photos.  With two babies, I do most my crafting at night, thus ugly pictures.

I really wanted to get a white based fabric with some maybe a little aqua design to cover the shades with.  Shockingly I was unable to find such a fabric at Walmart or the local quilt shop.  I decided to make my own by stenciling.  More on that in a minute.

1. Roll your shade along the wrong side of your fabric tracing the top and then the bottom with a pencil.

2.  Cut about 1/2 inch larger than your pencil line on the top and bottom.


This is how I made my own design.  Do you know about Freezer Paper? It's awesome and can be used in many ways.  It can be purchased at most grocery stores.  There is a paper and shiny side.

3. On the paper side trace your image and cut out.

4. IRON the shiny side to the right side of your fabric and sponge paint into the stencil!  You can make whatever image you want, and the paint won't bleed through the sides.  ALSO, you can reuse the stencils over and over, it irons on and peels off easy peasy.


 5. Trickiest part.  Using Aleene's Tacky Spray adhere the fabric to the shade.  It's sticky and this took some trial and error.

6. Hot glue your edges by folding into the shade.  Add a trim if you'd like!


Ta-da!
When I move to Arizona (we're counting down the days!) I'd like to find the perfect trim for the top and bottom.  I'm pleased how they turned out, definitely a statement!