Photobucket Photobucket Photobucket Photobucket Photobucket Photobucket Photobucket
SPACER

Sunday, December 27, 2009

C is for celebrate

Earlier in this crazy month, my co-crafterson Heather celebrated her birthday! I made this cute banner for her, and considering she has four daughters, I'm hoping it will be put to good use :)
These come together pretty fast, and they are also cute just plain without any letters. Use a ruler and cut out a triangle from an old cereal box to use as your template. Use pinking shears (zig-zag fabric scissors) to cut the triangles from your fabric, and they won't fray. Then all you have to do is sew the banner to a ribbon and you've done it! One thing I discovered with this one, I overlapped each flag a little and I like how it hangs a lot better than others I've made.

Won't that be great at birthdays and events? I don't even have one :( That's on my craft list. Happy New Year everyone !!! We're partying at Between Naps on the Porch, The Girl Creative, and A Soft Place to Land.

Tuesday, December 22, 2009

Advertise with Us!

Please contact us at

Our blog is growing quickly and we have lock-in rates available.
We reach a wide range of readers from DIYers, quilters, crafters and more.  As our stats are constantly changing as we grow, please send us an email and we would love to provide you with that information.

We also may host a giveaway for you as well as review items
Please contact us and we will see what we can work out.

Thanks!
Heather and Megan


Monday, December 21, 2009

Christmas Quilt

As Heather mentioned before, we are a threesome of sisters and our oldest sister Amy made this rag quilt for me! It was a couple years ago I asked her to make me one for Christmas, I wasn't a quilter at the time and she made and sold these quilts on Ebay, isn't it fab?? At the time the colors matched all my decorating, but I've sinced gotten rid of red and was so sad not to have this on display, only for snuggling. And then my grand idea, it's my Christmas quilt, and I love it!


One of the reasons I think she did such a great job is that she mixes fabrics and textures. Adding minky was a great touch. Thanks sister, I'll love it forever!

And, I think a rag quilt was one of my very first quilts I ever made for a friends baby. I highly recommend it as a starter quilt, they look great, they are easy to put together and it's hard to mess up :) Happy quilting!

We're partying at the Inspired Room, A Soft Place to Land and Between Naps on the Porch.

Thursday, December 17, 2009

Checking it twice

First thing I've learned...I am finishing ALL my projects in November, so the entire month of December I can have a beautiful house smelling of fresh baked cookies and so many adorable things your eyes can barely take it in. The way it is now...fabric everywhere, my sewing machine, ironing board and anything crafty are all over my family room taking away anything that looked remotely festive. Darn.

Here are some glitter balls I tried out this year. I like them, ribbon tied down from the curtain rod with a tie of tulle.


Three years ago Heather and I saw some tree skirts we wanted in a Pottery Barn catalog, so we headed to JoAnn's right that minute to get supplies. Much to our disappoint, we needed to know a decent amount of math to figure out the circles for the fabric, trim etc.. Turns out it had a lot to do with Pi, and not the delicious kind.


Here is the JOY that hangs above an old mirror (recognize it H?). I love mod podging letters, there are so many great ways to do this same trick over and over. This was a project a friend did last year, and I had a great spot for it.


We're getting down to the nitty gritty, so I guess my decorating is over. There were a few of my little spots, and there will be no grand picture, because there is none according to the above explanation! I had so many more plans and thoughts that won't happen, how did your decorating go?

As always, we're attending some parties, so go check them out too! The Shabby Chic Cottage, Thrifty Decor Chick, Hooked on Houses , The Nester, Amy Lou Who and We are THAT family.


Merry Christmas and Happy Holidays!


Thursday, December 10, 2009

Craft from the Past...

My Mommy made these WAY back in the olden days...
Are these not the cutest snowman ever? I believe they are circa 1970's? My mommy is the best toll painter in town. At least she was, and she would be still, if it was still cool...
They just got old enough to be cute again...FINALLY! I remember these snowmen from when I was a little girl. They were around each and every Christmas.


So I had to modernize them just a touch to help out with their coolness factor... I cut 3 5x7 papers from cute scrapbook papers. Love the Christmas Trees...


I still had 3 frames left over from my monogrammed frame project. So I then put the papers behind the glass.


Then I used a glue gun on the backs of the snowmen, and plopped these little dudes on each frame. I did it on top of the glass so I could peal them right off after Christmas, the snowmen are cool, but not cool enough to have their permanent residency in my favorite frames.

Ta-Da...10 minutes. (less time than the post is taking me for sure!)


Now when my girls grow up they will remember the snowman. Then I will give them to the most sentimental of my daughters because she won't give them to goodwill.


Then in about 30 years time, she will dig out the snowmen, and they will finally be cool again for the third time around. Then she will tweek them (because she will be a crafter). And put them on the wall for her children...


Thank you Mommy. See I didn't give your cute things to goodwill. That is why I earn the egg family :)
I will share a post about the egg family around Easter. Megan and I are fighting for them. I think I will win.

Friday, December 4, 2009

My Christmas Mantle...

Here it is. Don't you wish you could keep Christmas up longer? I think I will start earlier this year. I did it on the cheap, used mostly things I already had. I got the big gold mirror from Ross on clearance for $11. I intend to paint the frame, but it worked so great for my Christmas setting. The Tree on the left is my fall/Christmas double purpose decorating. You can see it on my fall mantel too... The apothecary jars have the filling switched out. The Santa is a craft from years back that I made. The Pine cone tree is a 90% clearance from last year. $3. And the only new item is the gold star which I got on %50 off from Hobby Lobby. I like how it turned out this year.
I am definitely a convert to the apothecary jars. I just dumped the fall fixings into a ziplock, and dumped the Christmas fixings into the jar.

Same here. And for the filler, I just chopped up a pretty garland I got for 90% off last year at Joanne's. It has pretty greenery, and pretty pine cones with crystal glitter chunks. Also the sweet white berries, all from the same garland. I think it turned out really pretty. Plus I will keep it out after Christmas, because it is still winter.


Same with this one, it was in my fall mantel too. Same chopped up garland, but added a strand of red wood beads to the bottom.


I used to be a crazy person and did a lot of cross stitch. But I found this line of super pretty patterns. (lavender something?) They are the most complicated patterns I have ever done, but so pretty. I imaging my girls will fight over them after I die. This is probably 60 hours of my time. Crazy, I wish I had that time to craft now.


Isn't he a perdy vintage looking Santa? Love him. Maybe I should keep him up after winter too???
Ahhh, bless this snowman's heart. I made these two stockings right after I got married a 11 years ago. I think the snowman is for me...

This funny dog is for my husband. I copied these 2 designs from pottery barn way back when. I intended to make a whole new batch of stockings for us this year, but it didn't happen. Maybe I should by all the fixings this year after Christmas, and make them right away. No crafting gets done in December right?


Here is the full view fire and all. Do you like?


Linking at The Shabby Chic Cottage, The inspired room, Finding Fabulous, A Soft Place to Land , amylouwho , southern hospitality funky junk, hooked on houses and Miss Mustard seed

Tuesday, November 24, 2009

Be prepared to die of CUTENESS

Okay, we have a dear third sister, that we didn't allow in our little quilt company and blog. We are super mean we know!!! However, she is SUPER talented in all her crafting endeavors. And because we love her, and really love this project, we are featuring her fabulous craft here...


How darling are these? This is my sweet niece with a super cute pony in her hair...

And can you tell that this sweet blue boy is actually a trouble maker? He only looks sweet and adorable...


Here are a few close ups to see the detail, she captures the eyelashes and hair!!!

She is making these custom pillows for her cute etsy Sweet Shabby Shoppe.

She starts with a good profile photo of her subject (children, babies, pets etc.) She tells you specifics on how to take a good profile photo when you order a pillow from her cute shop. She takes your photo, and with some mad photoshop skills, and a screen printing technique she transfers your child's silhouette onto the pillow.


This is a very detailed and custom product. It would be a great gift. She is also taking Christmas orders for the next few weeks. We ADORE these, and hope there are a couple of these pillows under our Christmas trees. :) Make sure to visit her etsy shop. Her button is our our sidebar, she is our first sponsor. She will be paying us with Silhouette pillows, because we would never feature her out of kindness and love. Is that wrong?


PS Posting this to Today's creative blog and a Soft Place to Land

Thursday, November 19, 2009

DIY Ornaments

We just gave our first free tutorial, what the heck, let's do another :) I recently created a whole bunch of templates to make felt ornaments, my new favorite stuff to work with, just look at my chickens! So I am going to call this a mini tutorial, because I don't have pictures to go along with it. For starters I have uploaded the templates for you to use here and here.

I decided to make an open stocking for each of my boys so I can stuff a little candy in them :) All of the other ornaments are stuffed with regular cheap batting!

HOW TO: Print off templates and cut around one template, let's say the stocking. Pin the paper to your felt and cut around (remember to double up for front and back!) Cut scraps of felt for the top, toe and heel if you want. Use a running stitch to attach each of these to the top layer of felt. You can also use fabric glue to help you on your way :) Finally, I did a blanket stitch around the entire stocking. I found this site helpful to learn the stitches, and I'm sure if you typed in any of the stitches someone would show you on video on youtube.

(I used a running stitch, back stitch, whip stitch and blanket stitch)

They make me so happy. I want to make 804 more.

Let me know ANY questions you have!

(PS the owl is not an original idea of mine, it comes from a crafty magazine a few years back...I just wanted you to know I'm not that amazing. Oh, and I'd add some googlie eyes to him.)
PS We added this to AmyLouWho's Sew and Tell Friday's.

Monday, November 16, 2009

A Holiday Runner

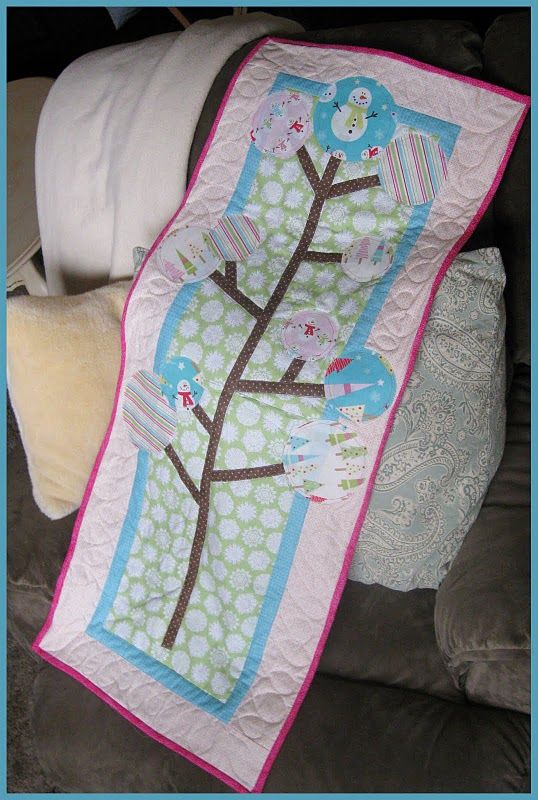
Heather and I are many things, but when it comes to our crafts, one of those things is not humble. How cute is that runner? And even better, you can make it, and we'll show you how! Our very first tutorial to show you how to make a holiday or winter table runner!
And what else is great? Choose fabrics accordingly and this can last you all winter, or it can be a spring runner. Endless possibilities I tell you.
To start, materials needed:
*1/3 yard green fabric for center
*1/4 yard aqua fabric for sashing
*1/2 yard pink fabric for border
*3-5 Fat Quarters for circles
*1/4 yard brown fabric for tree
*1/2 yard hot pink fabric for binding
*2/3 yard for backing
I totally dropped the ball here, there is no photos of me putting the background together. BUT you can do it! If you can read, sew straight and iron, you can make this, promise.
STEP 1: Start with 1/3 yard green fabric for center, using a rotary cutter, board and ruler, cut the piece to measure 10.5" x 36.5". Then cut 1/4 yard aqua fabric for the sashing into 1.5" strips.
Finally take 1/2 yard pink fabric for border and cut it into 3.5" strips.
STEP 2: Using the aqua 1.5" strip, match up to one side of the green center fabric. (You will have a good amount of sashing hanging off one end). Sew together, trim to match and press. Repeat on opposite side and then top and bottom.
Step 3: Repeat step 2 using the pink 3.5" strips.
Step 4: Make 75" of 1" bias tape using the 1/4 yard of brown fabric for tree.
Now, I used a bias tape maker that you can get at most fabric stores, I got mine at JoAnn's. It is cheap and easy, you feed fabric through one side and it come out the other where you starch and iron it, and then the ends are turned in! Ta-da! You could also make your bias tape using a fusible web (we'll use that on the circles in a minute) or you can purchase it.
Step 5: Using the main picture at the top as your guide, cut and place the tree and branches to your liking. The length of the main part of my tree is 33". Using a temporary hold glue, I used Aileen's from WalMart, paste it in place. Sew all the way around your tree and branches with invisible thread (my preference) using a tight zig-zag stitch.
Time to make circles! I've uploaded the template I used here, there is a 5" circle (cut 3), 4" circle (cut 4) and a 3" circle (cut 2).

Step 6: It is a good idea to make temporary circles from printer paper as a trial to make sure you like the size and placement, like below in photo 1.

Step 7: Using my template or your own, trace three 5" circles, four 4" circles and four 3" circles onto the paper side of the fusible web. (I used Heat n Bond lite found hanging next to the sewing notions at WalMart.) See below photo 2.

Step 8: No photo for this step. Roughly cut around the traced circle (not the actual circle, maybe 1/2" or so outside of it). Place the non-paper side of the fusible web on the wrong side of your fabric and iron. Once cooled, cut around your actual circle.
Refer to the directions on whichever type of fusible web you purchase, they may differ from my directions.

Step 9: Peel the paper away from the back of the circle and place exactly where you'd like it on your runner. Iron. Ta-da! See below photo 4.
You're almost there!

Step 10: Sew around the edges of your circle. I chose to do mine a little more decorative for fun, I sewed in about 1/4" with a hot pink thread. You can use the invisible thread again here if you'd like, it's up to you.
And....you did it!

Step 11: Stand back and admire. Show anyone within the walls of your home. Jump up and down. Giggle. Now compose yourself, you look like a fool.

It's just a runner.

:)

Don't hate me, you're thinking, man this is awfully thin?? Well there are a couple more steps to completion. It needs to be quilted. And I quilted mine on my own, bless my heart, there will be no tutorial for that. I recommend hiring a professional, my aunt always does ours but she's hundreds of miles away and I just wanted mine done immediately. You can find affordable women with long arm quilting machines who would do an excellent job. I'd ask at a local quilt store for a recommendation.

Shortly after handing it over, you'll receive the blessed call that it is ready. You'll pick it up and can't believe it's even more gorgeous than it left. All that is left to do is bind it, which is actually one of my favorite parts, because you can watch TV while you do it. I'll be posting a tutorial on how to bind a quilt (or table runner) in about a week! Stay tuned!

Please, if there are any mistakes or clarifications, let us know! Leave a comment or drop us an email! Happy quilting :)

PS We've linked with a few parties, we love them! A Soft Place to Land, DIYblogspot, the shabby chic cottage, 320 sycamore,and Today's Creative Blog so check out all those other amazing things. Also, See Mommy Sew is having a tutorial contest all of November, so go enter yours, and amylouwho for sew and tell fridays!


Wednesday, November 11, 2009

A Sweet Gift...

I am a slacker mother who should probably be on a large prescription dose of medicine treating ADD. I still don't have my little baby's quilt done. It is in a box cut up and somewhat pieced waiting for me to put in a few hours and focus. I was a big old lazy fat butt when I was pregnant, and knitting was exhausting to me. So I never finished his quilt, and now that he is 3 months old, I just don't seem to find the time. Thankfully a nice dear person made my baby this quilt.

This is my baby's first and only quilt. Made by a super nice person who knows who she is. Thanks and we love it! Weston is super snug!

I love all the polka dot prints. Who doesn't love some polka dots? The more the better right? And I think the super cute print in the middle with the little dear and frogs is a Michael Miller. I am not sure though.


And it is backed with the yummiest swirly green minky. I want to get naked and snuggle with it. TMI?


I love the color combination here too. Makes me happy...

And here is my little orange boy. (he had a jaundice issue for 6 weeks!, you have not seen a poor little heel get pricked so many times...he is better and pink and perfect now)

Ummmm now I just want to get my baby and snuggle on him for a few hours with the tellie...then I will lie to my husband when he comes home from work and tell him the baby has been horrible that is why the house is a mess and you don't get dinner...(TMI again? Am I the only one who would do such a horrible thing?) Hope you like this quilt. And the ADD must be genetic, because Megan and my Mother have still not delivered any quilts for this yummy baby!

PS We will be listing this at amylouwho, the shabby chic cottage , the pretty organized palace, the inspired room and my romantic home! We love parties!