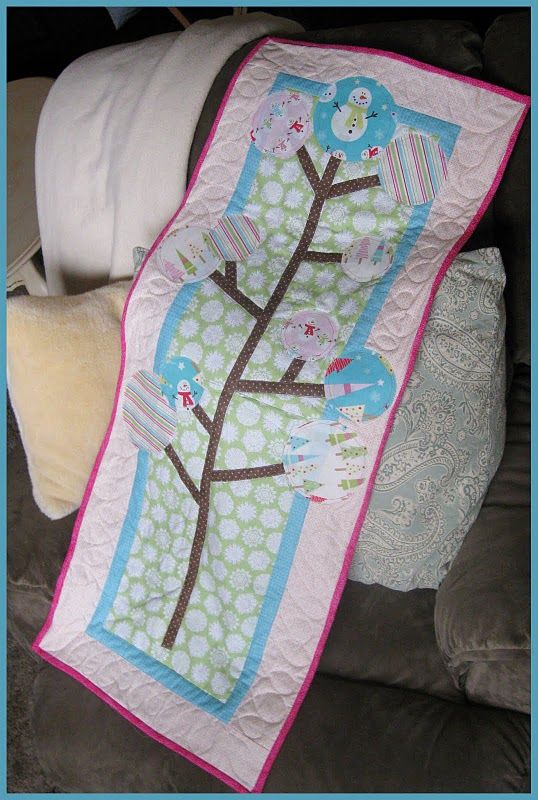
 Heather and I are many things, but when it comes to our crafts, one of those things is not humble. How cute is that runner? And even better, you can make it, and we'll show you how! Our very first tutorial to show you how to make a holiday or winter table runner!
And what else is great? Choose fabrics accordingly and this can last you all winter, or it can be a spring runner. Endless possibilities I tell you.

To start, materials needed:
*1/3 yard green fabric for center
*1/4 yard aqua fabric for sashing
*1/2 yard pink fabric for border
*3-5 Fat Quarters for circles
*3-5 Fat Quarters for circles
*1/4 yard brown fabric for tree
*1/2 yard hot pink fabric for binding
*2/3 yard for backing
 I totally dropped the ball here, there is no photos of me putting the background together. BUT you can do it! If you can read, sew straight and iron, you can make this, promise.
STEP 1: Start with 1/3 yard green fabric for center, using a rotary cutter, board and ruler, cut the piece to measure 10.5" x 36.5". Then cut 1/4 yard aqua fabric for the sashing into 1.5" strips.
Finally take 1/2 yard pink fabric for border and cut it into 3.5" strips.
STEP 2: Using the aqua 1.5" strip, match up to one side of the green center fabric. (You will have a good amount of sashing hanging off one end). Sew together, trim to match and press. Repeat on opposite side and then top and bottom.
Step 3: Repeat step 2 using the pink 3.5" strips.
Step 4: Make 75" of 1" bias tape using the 1/4 yard of brown fabric for tree.
Now, I used a bias tape maker that you can get at most fabric stores, I got mine at JoAnn's. It is cheap and easy, you feed fabric through one side and it come out the other where you starch and iron it, and then the ends are turned in! Ta-da! You could also make your bias tape using a fusible web (we'll use that on the circles in a minute) or you can purchase it.
 Step 5: Using the main picture at the top as your guide, cut and place the tree and branches to your liking. The length of the main part of my tree is 33". Using a temporary hold glue, I used Aileen's from WalMart, paste it in place. Sew all the way around your tree and branches with invisible thread (my preference) using a tight zig-zag stitch.
 Time to make circles! I've uploaded the template I used here, there is a 5" circle (cut 3), 4" circle (cut 4) and a 3" circle (cut 2).
Step 6: It is a good idea to make temporary circles from printer paper as a trial to make sure you like the size and placement, like below in photo 1.
Step 7: Using my template or your own, trace three 5" circles, four 4" circles and four 3" circles onto the paper side of the fusible web. (I used Heat n Bond lite found hanging next to the sewing notions at WalMart.) See below photo 2.
Step 8: No photo for this step. Roughly cut around the traced circle (not the actual circle, maybe 1/2" or so outside of it). Place the non-paper side of the fusible web on the wrong side of your fabric and iron. Once cooled, cut around your actual circle.
Refer to the directions on whichever type of fusible web you purchase, they may differ from my directions.
Step 9: Peel the paper away from the back of the circle and place exactly where you'd like it on your runner. Iron. Ta-da! See below photo 4.
 You're almost there!
Step 10: Sew around the edges of your circle. I chose to do mine a little more decorative for fun, I sewed in about 1/4" with a hot pink thread. You can use the invisible thread again here if you'd like, it's up to you.
 And....you did it!
Step 11: Stand back and admire. Show anyone within the walls of your home. Jump up and down. Giggle. Now compose yourself, you look like a fool.
It's just a runner.
:)
Don't hate me, you're thinking, man this is awfully thin?? Well there are a couple more steps to completion. It needs to be quilted. And I quilted mine on my own, bless my heart, there will be no tutorial for that. I recommend hiring a professional, my aunt always does ours but she's hundreds of miles away and I just wanted mine done immediately. You can find affordable women with long arm quilting machines who would do an excellent job. I'd ask at a local quilt store for a recommendation.
Shortly after handing it over, you'll receive the blessed call that it is ready. You'll pick it up and can't believe it's even more gorgeous than it left. All that is left to do is bind it, which is actually one of my favorite parts, because you can watch TV while you do it. I'll be posting a tutorial on how to bind a quilt (or table runner) in about a week! Stay tuned!
Please, if there are any mistakes or clarifications, let us know! Leave a comment or drop us an email! Happy quilting :)
PS We've linked with a few parties, we love them! A Soft Place to Land, DIYblogspot, the shabby chic cottage, 320 sycamore,and Today's Creative Blog so check out all those other amazing things. Also, See Mommy Sew is having a tutorial contest all of November, so go enter yours, and amylouwho for sew and tell fridays!
















30 comments:
Very cute! Love your colors.
very cute! I'm using the same snowman fabrics for our Christmas skirts!
Love it!
How cute! I love it! You almost persuade me to make one....oh alright I will make one it is so cute! Thanks for sharing!
Hm, it's about time for another sewing project! I love it! I'm off to look through my fabrics :)
That is amazing!
I want you to make me one for christmas!!! I Love it! It is super cute. I really think it is adorable!
So Cute!!! I've been waiting to see something new, yea!!!! I love it!!
Nadine
How cute! Love your blog design too, by the way. :)
Cute!...I am hosting a tutorial contest this month...if you live in the USA you should enter!
Sorry I'm late! I LOVE the runner and great tutorial! Thank you so much for adding your creativity to the DIY holiday party!
I've always wanted to make something quilted. This looks like a great project to start on! :)
Have a great rest of the week!
Roeshel
Wow, I'm loving it. What beautiful fabric and a great looking runner. I would have to run out and buy cute plates to go with that cute runner! Hmmmmmm sounds like lots of fun!
Blessings,
Debbie
Oh how I wish I could sew! It's adorable.
@Cheap Chic Home. This is so cute and easy. Do you decorate in these pastel colors? I can't wait to see the holiday decor.
Oh I wish I could sew {{whine}}. That so beautiful!
What a creative piece! Love it!
Wish I could sew! This is beautiful!
too cute...but mine might end up as a door decoration!
thanx for the inspiration!
Really cute :-) Your colors are so festive too. Maybe I'll challenge my sewing skills and give it a try.
I love this! The colors are so cute, thanks for the heat & bond tutorial :)
Love it!!! Thanks!!
Blessings,
KT
Very cute!
this is so great...thanks for the fun instructions. it is adorable
Love your Holiday Runner and the colors are so soft. Thanks for a great tutorial.
Now I have to make one of these! Yours came out so great and those colors... need I say more?
Sew cute! I can see where this pattern could work for just about any season... thanks for the tutorial! ;o)
Thank you for the tutorial. This is sweet!
this is really cute! Thanks for a fun tutorial!
Awesome tutorial! I LOVE it!! Thanks for sharing! :)
Oh my gosh !! VERY CUTE !!! and thanks for sharing the tutorial!
Post a Comment