Photobucket Photobucket Photobucket Photobucket Photobucket Photobucket Photobucket
SPACER

Friday, May 28, 2010

Is it YOU?

Are you the winner of 5 of these patterns??

If you're name is
ktquilts
then yes!!!  Congratulations!

Not only does ktquilts follow us here, but she's also following our new blog, Quilt Story.  Are you? :)

We've been overwhelmed by your responses to the giveaways and the new blog, so thank you.  We did have some great assistance from the Blogger's Quilt Festival...but that didn't stop us from being full of ourselves all week.  Heather and I regularly talk about how many followers we have, and I had no idea how much my self-esteem relies on that number ;)

Hop on over to Quilt Story and see if you've won patterns over there or the fat quarter stack.  Also check out two of the quilts we featured this week, they are inspirational!

Thursday, May 27, 2010

I painted a cute girl....

Okay, I painted this girl a couple months ago with my little girls. We had it all planned, the two little babies went down for a nap and we broke everything out. My three girls each had a canvas and paint shirts ready to go.  I went to etsy and found a cute painting to "inspire" me, (it is almost exactly this, but her girl was prettier and sadder, and her ground was way better)  It was actually alot of fun as I hadn't painted in forever!
My dear is the most talented of all, especially painting. I am trying to have her do a tiny business and do custom painting....we will see, hopefully soon she will have a blogspot.  Anyhow, I didn't just whip this out, I have had lots of training from my Mom. (Thank you Mommy dear) But whenever I paint, I think I want to paint more.

This sweet girl is on the wall in my craft room. The colors go quite well.

Come back tomorrow and we will announce the giveaway winner!

Linking to some of these fun parties...

Thursday, May 20, 2010

Quilt Festival Extravaganza!

I love the word "extravaganza" and use it every opportunity I get.  Makes everything fancy. Okay, focus.

I am so excited to be posting right now!  For a few reasons, first Park City Girl AMY is having her blogger's quilt festival which we've been waiting and waiting for!  You must go check out all the amazing quilts people are making.

Speaking of amazing, my mommy designed this quilt for my sweet baby boy!  Isn't it precious?  I love everything about it, the sailboats, the water...the colors.  I adore.


Megan and I are so lucky to have such a talented mom, let me tell you she put so much thought and time into every bit of this quilt, and I am so grateful.  It will live through our family for generations to come I'm sure.  And yes, this bad boy will soon make it to the printing press to be one of our patterns :)

The next reason I am so excited to be writing this post?  We are launching our new blog, bold, we know. Bless our hearts, but please indulge us.  We are absolutely giddy over it.
Fresh Poppy Design

It's called QuiltStory and it's a place where we want to share other's amazing quilts and stories that go along with them.  We want readers to come and admire as well as quilters to make their submissions. Please go and check it out!

Finally, the last reason I'm excited and quite frankly why you will soon be excited, we're having a
FABULOUS GIVEAWAY (extravaganza)!

Choose 5, count it 1-2-3-4-5!!! of our patterns!!  And for those of you maybe a little intimidated by the quilting, you could also win:

A stack of 5 fat quarters to do what your heart desires.  Now the giveaway for the fabric is only on our Quiltstory blog, however we are giving away 5 patterns on this blog AND quiltstory!  So basically there is eleventy billion ways to win.

How?
- 1 entry per comment
- 3 entries per follower
- 5 entries if you submit a quilt and story to Quiltstory (details there)

Please state in your comment(s) what you have done, and make sure to enter both blogs!  We will announce our giveaway winner at the end of the quilt festival, May 28th.

Wednesday, May 19, 2010

How to make a tie shirt

After having my second little boy I knew that I'd have to get creative if I wanted to make things for my little boys!  I can't remember where I first heard of or saw tie shirts, but I love them.  They are just nerdy enough to be perfectly adorable!

I searched through blogs and etsy observing how everyone else made their shirts, and finally settled on the way that I love :)  I will share with you here how I make my tie shirts, and hopefully you'll love them too.

Materials needed:

-plain t-shirt or onesie
-heat n bond or some kind of fusible web for applique
-fabric for tie (scraps)
-sewing machine

Step 1:
Trace the tie pattern onto the paper side of your heat n bond.  I separate the two pieces, the knot and the tie.  I like the pattern of the knot to be in a different direction than the pattern of the tie.  I have included my templates for you here, in sizes 3-6 months and 2T.  Using a ruler you can make these shorter/longer and wider/thinner.  My suggestion is that the tie is within 3-4 inches of the bottom of the shirt.  I find if the tie ends too high on the shirt it's just nerdy enough to be down right nerdy.  Roughly cut around the pieces and iron to the wrong side of your fabric, like so:

Step 2:
Following the directions of your heat n bond, cut exactly around the tie, peel of the paper and iron to the shirt. It's now ready for you to sew around. Sew.

Step 3:
Stand back and admire! They're that easy. I think the trickiest part is picking the right fabric stripes and plaids work amazingly and the right size and length for the ties.

Step 4:
Adorn cute cousin boys with matching tie shirts.  Perfection!


As always, we will be linking these cutie pies to some linky parties, so check them out.  Seriously you can find some amazing talent at these parties!

Saturday, May 15, 2010

From drab to fab

It is pretty rude of me to refer to this as "drab" considering my dear sister had made this for me.  However, she should be flattered because I love it and have had it in my room for several years!  I have changed my bedroom colors and the frame was in need of a paint job, so I decided to just re-do the whole thing.
My finished project!  I took it apart in the back and using a stencil I painted the Fleur De Lis onto plain white fabric.  Then I spray painted my frame, I believe the paint is called "Ocean Breeze".
It just looks so fresh and happy now!  As you can tell, I can't bare to place any memos on my memo board.  It just looks too pretty as is!

This was a small part of my bedroom makeover, which I will be sharing soon.  I went from creams, sages and blue to aqua, turquoise and white with some touches of gray and burnt orange.  It is so nice to finally do a little bit in my bedroom, it is always the last spot to get some love :)

Check out our linky parties button accross the top...see all the great places that we like to link up with as well as get fabulous ideas!! Hope you check them out soon!!

Sunday, May 9, 2010

Two Blankets, Two Ideas

I've recently made two pieced blankets for friends, and when I finished I thought they were the perfect patterns for a variety of blankets!  I am going to give you a semi tutorial.  Meaning if you've had a little experience on the machine, you'll be able to make these too.
(They are not difficult to make in the least, however, I am not doing a step by step how-to)

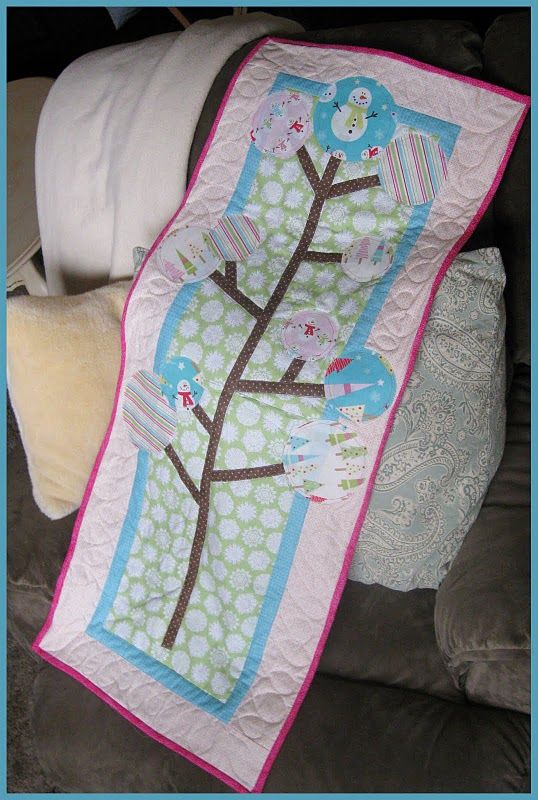
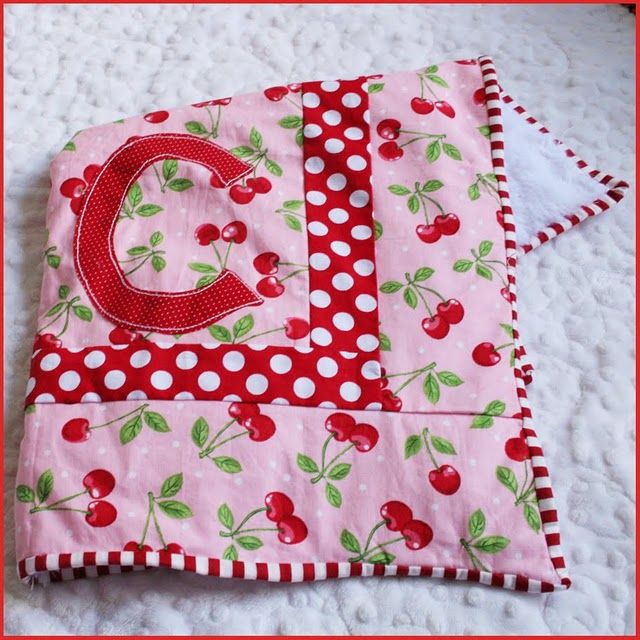
This was for my sweet friend Sara's new baby boy Simon.  I had a few 1/4 yards of fabric and was thinking and thinking of how to piece it and not have it look weird or like leftovers (which they weren't!).
My favorite part is the middle strip.  It'd be cute left alone, or with a variety of applique's.  I considered argyle diamonds, spelling out "sleep" or "Simon"...and ultimately settled on stars!!
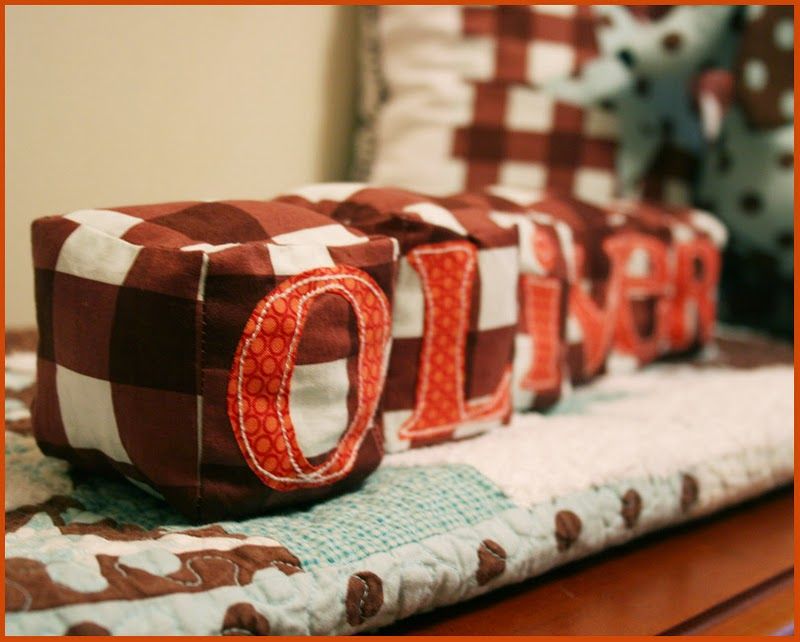
On a side note, I made this ball to go with the blanket.  I always feel like I have to have a little something extra to go with "main" present.

Here are the measurements for this blanket.  The finished size is 38" x 23".  The measurements in the diagram below are what I cut the fabric, prior to sewing.  My seam allowance is 1/4".


Here is my pieced blanket #2.  This is a car seat blanket.  Heather and I discovered these about three years ago when we were making blankets for our soon to be babies, who were born only two days apart!  It is so nice to have a small blanket to squish around your newborn, instead of a full size blanket that you have to fold 8 times to get around them.

The same story for this one as well, it would be adorable without any applique at all...however an initial, heart, crown, etc. could make it so sweet too!
They can be finished by binding the edges or just simply turning inside out with a finishing stitch around the outside.  Either works. 

And when the baby gets older, it's a great little blankie to play peek-a-boo with :)
I always have to try and sneak one of my boy's in a photo shoot.  Guess it was Ollie's lucky day!
The finished size for this blanket was 24" square.  Once again, the measurements below are what the pieces were cut to, prior to sewing. My seam allowance is 1/4".
There you have it!  Two basic patterns to make a variety of easy pieced blankets!

If you are feeling adventurous and want to give one of these a try, please link us!  We'd love to see your finished project.  If you are a little nervous but would like to try it out, contact us because I'd love to answer any questions.

Happy Mother's Day!!  As for me?  Looking forward to snuggling on the couch with my oh so busy husband and watching a movie of my choice.  Mmmm can't wait.