Photobucket Photobucket Photobucket Photobucket Photobucket Photobucket Photobucket
SPACER
Showing posts with label tutorial. Show all posts

Tuesday, November 16, 2010

A Turkey Tutorial

If you are visiting from Sew Much Ado, welcome!  Stay a while!

Do you all know the fabulous Abby of Sew Much Ado?  Well...you should :)  Last week she had a Copycat Challenge where readers submitted their copycat work in three categories, accessories, home decor and clothing.  Right now they are voting on the finalists, so you can check out the best and vote for yourself.

Abby asked Heather and I if we would be guest bloggers during this challenge.  Um...YES!  I set out to make a home decor copycat, and here's what I came up with!

First, the inspiration:
these darling headbands from Pottery Barn Kids

...and although I thought for 12 seconds of making these for my boys, I decided on something that would get a little more use...

My interpretation:

I just am loving embroidery hoop art lately

Want to know how to make this also?
Okay.

The tutorial is just below, but I wanted to introduce you to Little Christmas House.


The pattern for this little cutie is available in our shop, you could also purchase a kit!

Embroidery Hoop Turkey Art Tutorial

Materials:
  • 9 inch embroidery hoop
  • Muslin (enough for a 11" circle)
  • Fusible web (like Heat n Bond)
  • 10 or so felt varieties
  • matching embroidery floss
  • needle
Step 1: Using the embroidery hoop as your guide, cut about an 11' circle from your muslin.
*Note: works best with a Dora pencil


Step 2: Using this pattern, trace each piece individually onto the paper side of the fusible web.  (For the feathers make sure to go a little longer "into" the turkey body).  Cut roughly around each piece, lay the shiny side paper onto the back of each felt piece and iron.  TAKE YOUR TIME.  Start out with a low heat and have another fabric in between the iron and the felt.  Some felt could burn and be altered through ironing. **Be wise and refer to the directions on your fusible web packaging**

Step 3: Peel the paper off of the felt.  This should leave a nice shine on the back of the felt.  Using the same method for ironing felt as in step 2, place all of your pieces onto your circle of muslin, and iron into place.

Step 4: You're ready to stitch.  But first we need to separate your embroidery floss.  Embroidery floss has 6 strands of thread in each piece.  I used only 3 strands for stitching everything except I only used 2 strands to stitch the words.

Step 5: Stitch!  I used a back stitch for everything.


Step 6:  I used a little trick for the words.  I tried to use a pencil to trace the words onto the felt but it would not work.  What I ended up doing was traced the words onto wax paper, pinned it into place on the banner and stitched through the wax paper onto the felt/muslin.  It worked fabulously.


Step 7: Pull the muslin on all sides to tighten the fabric.  Once in place, trim sides to about 1". 


Step 8: Hot glue the edge to the inside of the hoop.


TA-DA!


Thanks for stopping by!
Happy Thanksgiving!
Thursday, September 16, 2010

Another sneak peak. Mod Podge Star...

MOD PODGE STAR TUTORIAL


Okay, here is what you do. First buy one of those giant metal stars. Spray paint it black.


Make a pattern out of card stock the size of each of the angles. It will always be the same shape, you just have to flip it over for every other angle of the star. You know the drill. Mod Podge. I got all my pieces down, then did 1 coat over the whole star.

Next you are going to do a wash on the angles. Alternately, you can "ink" the edges of each paper before you mod podge. I like to do a wash. Just acrylic paint with water.


Get an angled brush and dip the edge in the watery paint. Go along all the edges of the shapes. This is very forgiving. Just to make sure you do it on top of the mod podge layer, otherwise you would be painting raw paper and it wouldn't be forgiving.

FINISHED!


You have your star...


We'll be linking to some fun and crafty parties here, check them out!

Tuesday, July 27, 2010

Meet my friend Sara

Today I'm trading blogs with my bestest crafty friend, Sara.  Do you know how I met Sara?  I moved to Missouri where my husband would be going to school.  Sara and I knew of each other, but for several months hadn't really talked much.  One day in Walmart (the only store in town) she spotted me.  I was on the phone with my sister, of course, and she came over with a card and her number and said to call her and we should hang out that afternoon!  And so, we did...and since then we have had many a crafty date.  Oh how I wish I could be like her and make friends so easy!  She really is such a great friend, and today she is sharing a tutorial with us, so here is Sara!

(ALSO Sara is part of the Midsummer Blog Party and giving away an adorable minky blanket, go here to enter.)


Hi, I'm Sara.
a.k.a. SewSara.
I guess I'll tell you a bit about myself.

I love to sew and create.
Sometimes the ideas in my head are better than the finished product. Actually, most of the time.
But it's all about trial and error. My kids don't know the difference when I make them pj pants and the crotch hangs to their knees, right?

My tagline on my etsy shop says, "making use of my home ec degree." It's true. I went to college for this. Ha! I never taught high school like I thought I would, but it makes for a fun story anyway (and all those fun student loans to show for it).

Some of my favorite things in this world are: fabric, polka dots, mod podge, spray paint, paper goods (I loooove office and stationery stores), diet coke, donuts, the color red, and oh yeah - my three kids (Max, Ruby, and Simon).

This is my first time doing a blog trade ... I'm excited! Thanks for having me, Fresh Poppy Sisters!


I'm always on the lookout for cute towels to make bibs for my kids. I usually can't find them so I make them like this (or this). But they are way more time consuming that way. (That's why you don't see many in my etsy shop right now).

The towel makes it so much easier. And these are my favorite because they last forever -- even my 5-yr-old and 3-yr-old still wear them when we eat spaghetti (they call them "spaghetti bibs") or do art!
And now that baby Simon (my 6-month-old) is tasting his first foods, he's wearing them, too.
And I can just wipe his face with the towel bib ... it's great.
Plus, I hear that some of those plastic bibs have nasty chemicals in them.
So -- keep your eye out for cute towels! I look in the kitchen and bath sections.

I found this towel at the DOLLAR STORE, so I pre-washed it to make sure it didn't fall apart.
So far, so good. I guess we'll see if it stands the test of time.
If not, I'm only out one dollar (obviously).


You should be able to click on any photo to see it full size.
I never know if I'm being detailed enough, so please ask questions in the comments if
I've left out anything!


Now... prepare the ribbing for the neck piece.
Make sure you cut it so it stretches length wise. 
This is 100% cotton rib knit. If you're not sure what to buy, ask at the fabric store
and they should direct you to the right stuff.


I have an applique tutorial here. Or Megan did one here.

If you try it, I'd love to hear from you!
Hope you enjoyed the tutorial and hope it made sense.

Please leave a comment for Sara (don't we all love those??), go to her blog, become a follower...ya know, the works!!

PS Linking to our Weekly parties here, The Shabby Chic Cottage and somewhat simple, and Amylouwho,  so check them out!  Oh and we're new party goers here:


Black Kats Design

Wednesday, June 23, 2010

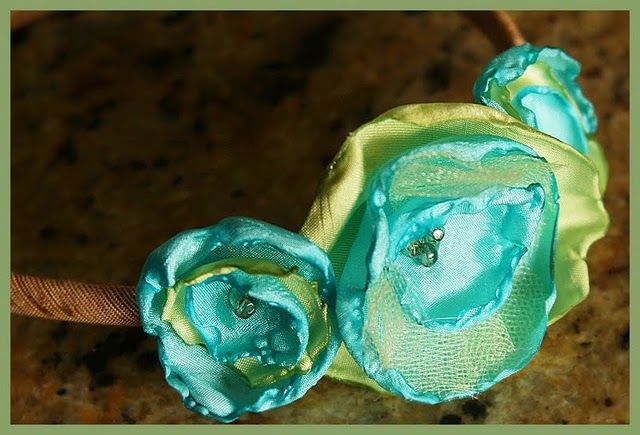
Singed flower headband tutorial...

Singed Flower Tutorial...


Hi folks, today we are going to learn how to make singed flower hair clips or headbands. I didn't invent these, I have been seeing them around blog land lately, but I will show you what I know, and add in some tulle (which I haven't seen yet...)

Supplies needed:
Scissors
Synthetic silk fabric (don't get the real thing, I tried, doesn't work) anything synthetic is fine.
tulle
matches
beads
headband, or hair clampy clip thingy.
Don't get perfect here. Just cut three circles each smaller than the other. My largest here is probably 4 inches. But you can play around with this. These do not have to be perfect circles.

Okay, this was a little hard taking a pic. But all you do is light a match and move it around the edges of the flower. You mostly want the heat on the fabric, not the flame or it may burn and get black. Which is fine for some colors, but not alot.  You will see the fabric start to melt and bend and pucker. Do this to all three...

Next cut 3-4 2 inch squares of tulle. (don't break out a ruler or anything, just eyeball it)
Fold the tulle in half, then in half again.

Then round it off with scissors...


Now if you have any miniature humans around you begging for food, you may have to make a grilled cheese in the middle... You can see I started to hot glue my layers.


Just put a blob of hot gule in the center, add a layer, etc. Then at the top, do a big blog and add 3 beeds.  Some folks are more of perfectionists than I am, in that case, you can do this with a needle and thread.

Hot glue to the head band. And I don't think I need to say this, but please offset the flower. We don't want people walking around with a flower on the tip top of their head..

Ta Da! You are done!


Now sit back and admire them on your head, or in this case your cute daughter's head...
Now look at your cute flower headband....

Now look at  your mess....

Now look again at your flowers...

Now the mess...

Was it worth it????? What do you think???

linking up to amylouwho

Thursday, June 3, 2010

Cover that shade!

We've been MIA, once again.  Have you been to our QuiltStory blog?  We've been so excited, we've been working hard on it all week.  Whether you make quilts or just admire, go check them out.  And let me say, these aren't your grandma's quilts, these are vibrant darling quilts that I'd love to have in my own home!! 
my aplologies to grandma's and grandma quilt likers :)

Plus in the morning we'll be featuring my fabulous friend Sara and I'd love to see her get many comments!!

I've been meaning to post this for a bit.  My lovely friend Sara gave me her lamps when she moved.  ...this really isn't a before picture...see they used to be brass lamps and she made the first great leap by spray painting the bases.  I LOVE the color, so I decided I wanted to cover the lamp shades with new fabric, and here's how I did it.


Let me apologize for the awful photos.  With two babies, I do most my crafting at night, thus ugly pictures.

I really wanted to get a white based fabric with some maybe a little aqua design to cover the shades with.  Shockingly I was unable to find such a fabric at Walmart or the local quilt shop.  I decided to make my own by stenciling.  More on that in a minute.

1. Roll your shade along the wrong side of your fabric tracing the top and then the bottom with a pencil.

2.  Cut about 1/2 inch larger than your pencil line on the top and bottom.


This is how I made my own design.  Do you know about Freezer Paper? It's awesome and can be used in many ways.  It can be purchased at most grocery stores.  There is a paper and shiny side.

3. On the paper side trace your image and cut out.

4. IRON the shiny side to the right side of your fabric and sponge paint into the stencil!  You can make whatever image you want, and the paint won't bleed through the sides.  ALSO, you can reuse the stencils over and over, it irons on and peels off easy peasy.


 5. Trickiest part.  Using Aleene's Tacky Spray adhere the fabric to the shade.  It's sticky and this took some trial and error.

6. Hot glue your edges by folding into the shade.  Add a trim if you'd like!


Ta-da!
When I move to Arizona (we're counting down the days!) I'd like to find the perfect trim for the top and bottom.  I'm pleased how they turned out, definitely a statement!