Photobucket Photobucket Photobucket Photobucket Photobucket Photobucket Photobucket
SPACER

Thursday, October 14, 2010

Spooky Runner

I am having so much fun this year increasing my Halloween items...next year will be so fun when I open up my box and remember it all again.  (Isn't that the best?!)

A few of weeks ago Heather and I got a grab bag from Material Girl's Quilts in Utah.  We were gid. dy. (yes two words) when we saw that there was not only Halloween fabric involved but Boo to You by Riley Blake.

Of  course we knew we had to make a runner. 
 We both made a brick pattern.  I have a large brick pattern going across the middle of the runner.  On each side I have a smaller brick pattern running in the opposite direction.  I believe my larger rectangles are 5 x 8 and the smaller are 2 x 5.

And a scrappy binding.  My new fave.

Heather and I each made one right?  Well she sent me a picture of her finished runner via text and I noticed that she had enough fabric to make a good size runner using only the larger rectangles.

Hmmm.

We supposedly split the fabric.

Who cut it you ask?

Do I have to answer?

Monday, October 4, 2010

The last teaser I promise...

This is the last sneak peak of the nursery before the big reveal. This whole room has taken way too long. And sometimes I need to go to the store and just buy something instead of having to make everything. It is super cute, and super custom and I can't wait to show it off...

I am trying to paint the book shelf, it I do get it done, or I don't get it done, I will post it next monday promise.

I think everyone will like it. It makes my heart skip a beat each time I walk by...

Tuesday, September 28, 2010

Halloween mantel on a budget!!

I finished my mantel and it came together in probably 15 minutes...I was a happy little camper to say the least!  AND I probably spent $10 total.  (Some things I had from before.)  So here is what I spent and some little tips I've got, hopefully you can find something useful!
Halloween buckets stacked on top of each other: $1 each Target 1 spot.
Glittery haunted house: $3 Kirkland Home (are these anywhere else other than AZ?? Love it!)
Glitter skull: Dollar Tree, $1 :)
Black birdie: Present from my mommy
Old medical book: Free from my honey's school!
Black crow: Dollar Tree, $1
Skulls in apothecary jar: Dollar Tree, $1
Candy Corn in Walmart glass: Probably $2 for candy and $1 for the glass

Tip: REPURPOSE!  For 30 days you can mess up some of your other decor to make your mantel, table, etc. adorable!  The candle stick I spray painted and it is usually in my kitchen, I paid $3 for it originally.  The apothecary jar is usually in my bedroom with seashells.  I also tied some leftover fabric strips around the top of the lid.  And I left my little boys in the frame up...they aren't too spooky but I thought the gray frame still worked fine!
Spider: Dollar Tree, $1
Cute banner: From Ms SewSara herself
(there are so many tutes out there on how to make one of these cuties, so fast!)
Spider/web: Also from Ms SewSara!
There you have it!  My Halloween Mantel on a Budget!

What are your holiday decor on a budget tips?
PS Don't forget to check out these great linky parties, including Get Your Craft On!

Friday, September 24, 2010

Boo!

I want to make lots of monster creatures.
I made this little guy for our mom, and I guess I kinda invented him. He's crocheted, and I used this free ball pattern for his body alternating colors every four rows. His arms started with a chain four and increased to eight I believe for probably 5 inches. His eyes, mouth and ears are all made of felt and stitched onto his face. I was happy with this quirky little guy!
Our mom loves to host a Halloween party with loads of grandchildren. So I wanted to add to her cute decorations, and I love me a banner.

Using a cardboard template and rotary cutter I got my perfect triangles and sewed them to a ribbon. Using fusible web I traced the letters and ironed them accordingly. A good tip: If you aren't the best with your applique skills (me) it's awesome to use invisible thread. I think colored thread can make more of a statement, but until I can sew straight better, I'm sticking with invisible thread.


And there you go! Happy Halloween everybody, can't wait to check out all the goodies and eat a few too.

Let me know if you need any more specifics!
PS This was a re-post from last year, however it's probably new to you, right??? :)

Tuesday, September 21, 2010

Fabric Bracelets

I recently got back from a 2 week vacation back to my "home".  I had to leave my love here and got to go stay at my parents with my two little rascals. 

We had a blast.
We missed the man.
I spent many a craft night, afternoon and a weekend with my dear sister Heather.
Miss you.

About an hour after I left she sent me a text of a picture of her giant crying eyeball.  Sad.

Earlier this summer I was flipping through a catalog of a fabulous designer.  I wanted to cover myself head to toe with fabric I love it so much.  If it were socially acceptable I'd drape myself in fabric. (Seinfeld anyone!? :)

Immediately I got out my scrap fabric and started on a bracelet I designed in my head.
We are very impulsive.
Heather has paused a movie, ran to her bathroom and cut bangs to match the actress. No lie.

This is what I came up with.


Since this summer I've been debating about offering a tutorial on how to make these or selling them or both.


They are made with scrap fabrics into small yo-yos and then glued to a thin elastic piece.  They are simple, but take a decent amount of time.

I quite like mine and wear it often.  It gets me that much closer to my ultimate goal of being covered in darling fabric. :)

What do you think?

PS If you are interested in purchasing one, contact us at freshpoppydesign{at}gmail{dot}com!

And check here to see the wonderful parties we're linking up to!

Thursday, September 16, 2010

Another sneak peak. Mod Podge Star...

MOD PODGE STAR TUTORIAL


Okay, here is what you do. First buy one of those giant metal stars. Spray paint it black.


Make a pattern out of card stock the size of each of the angles. It will always be the same shape, you just have to flip it over for every other angle of the star. You know the drill. Mod Podge. I got all my pieces down, then did 1 coat over the whole star.

Next you are going to do a wash on the angles. Alternately, you can "ink" the edges of each paper before you mod podge. I like to do a wash. Just acrylic paint with water.


Get an angled brush and dip the edge in the watery paint. Go along all the edges of the shapes. This is very forgiving. Just to make sure you do it on top of the mod podge layer, otherwise you would be painting raw paper and it wouldn't be forgiving.

FINISHED!


You have your star...


We'll be linking to some fun and crafty parties here, check them out!

Monday, September 13, 2010

Sneak Peek...nursery...

Why does everything take so long for me?

Maybe it is because I generally make nearly everything in the room myself (or with the help of a giving mother and mother in law)

Sometimes it would be easier to just go online and buy everything. Maybe Weston's nursery would be done by the time he was born. Not after he was one year old!

I have been in my house for over 5 years and my Master Bedroom has still never been finished. (part of that is being a scaredy cat).

I just need to focus my ADD and get this done. I think I have all the bits and pieces, but I need to get them on the wall, hung, etc.  a little mad at myself about it all...


Okay this "board and batten" (or whatever you call it) Was a pain in the butt serisously. I think between my husband and myself it was about 25 hours labor. (When was the last time you and your husband had that kind of spare time?
Was it worth it? I LOVE IT! I want trim work and moulding all over my house!

Pinky Promise a reveal super soon!


Wednesday, September 8, 2010

Our Mommy is the nicest Mommy in the world...

Turns out I (Heather) am a taker not a giver (lets be honest, so is Megan). Several people in my family agreed. So a few months ago I bought canvas, paint, and found a cute photo online. I brought everything to my Mom. Told her in detail what I wanted. What I wanted different from the online print. Then I gave her a 2 week deadline.

Does that make me a taker?

Fortunately for me, my Mother is a giver...here is the canvas she produce for me, ahead of schedule by about a week...

SERIOUSLY! Does it almost make you cry? This is for Weston's nursery.  I LOVE IT! I have a thing for elephants because of Dumbo. All my girls loved dumbo when they were around 2 years old. Plus I really love the Baby Mine song. Alison Kraus has a beautiful version.

That is me and Weston (no fat jokes please)... The grey and aqua are the colors of his nursery. (which will be revealed within 2 weeks..promise!


Our Mother can make or do anything! She is an artist, decorator, sewer, quilter, crafter, plumber, handyman, tiler, wallpaper..er, hardwood floor installer... etc. Seriously everything!


She is the best Mommy and Grandma ever!

I don't want to be sentimental here, but really, people get jealous of just how nice our Mom is.  She is such a compassionate person. When we have babies we are in Heaven because of how she cares for our other children and pampers us like we are at a spa. She cleans out my fridge regularly, and my car. She is a little OCD about cleaning...but that is another post where we will mock her!
Love You MAMA
(She is a loyal blog follower too)

Friday, September 3, 2010

Pottery Barn Tray project...

I didn't want to post this because in the end I am not super happy with it, but I thought I could get advice from you all?

I got this pottery barn tray just like this at a outlet type sale. It was $5. I imagined all the grand things I could do with it. First spray paint it all...


Second, tried unsuccessfully to line up some cute scrapbook papers...

Slapped it together...Don't like the seams....don't like the glare...

Love the pretty tray table and all of it's potential...

Sprayed the cute birdie too...and found the darling vase at DI.

Now, what to do?

Wallpaper?

Fabric???

Tile???

ANY ADVICE PLEASE???

Tuesday, August 31, 2010

Do you have a fabric project?

Do you have a fabric project from the past week?  We'd love for you to link up and share it on our Quiltstory blog.  Today I'm sharing my finished quilt top for my bedroom (finally)!

I cannot wait to get it back from my aunt and start to bind it.  It's a good throw size and it will lay across the end of my bed. 

Heather has been painting her little heart out all week, finishing up baby Weston's nursery.  You're gonna be blown away, seriously.  I can brag this much because she's my sister, right?!  Really she is quite talented, her finished rooms could be in magazines.  Do you remember Sophie's room??


I am so sorry if you just had to clean up the barf from all of your computer (out of cuteness of course).  Click here if you want to see that original post again!

Stay tuned, this week she will be sharing a major sneak peek of Mr. Wes' room!

Friday, August 27, 2010

Cute Photo Block tutorial...

1. Buy a block...(in Utah Woodworks sells a little kit with the block, bulldog clip and plastic slide thingy) Otherwise it is about 3.5 x 3.5 square block. Sanded, and edges are rounded a bit.

I just did a wash in black along the edges since they will be showing.

2. All the supplies you need are here.


3. Photos I ordered from Costco in smallish sizes. Cute scrapbook papers and a few embellishments. (roberts)

4. Invite Jeff Lewis along. (flipping out, bravo, funny!)


5. Cut papers just smaller than the square, about 3 and a quarter. Mod Podge down, add pics and mod podge on top of those too...


6. When it is all dry, glue on brads, ribbons, flowers etc. Mine is for my baby boy Weston. So no girly stuff.


7) Chipboard accents like the "W" are fun. Just mod podge cute papers on, and cut out with exacto knife. I did this to the checkers chipboard frame too...
Finished. Cute in a stack of three if I ever get to the other two.


I mounted the photo on chipboard for the bulldog clip. This is also fun to switch out the photo.

Finished! Hope you like.

Tuesday, August 24, 2010

Lolly Jane!

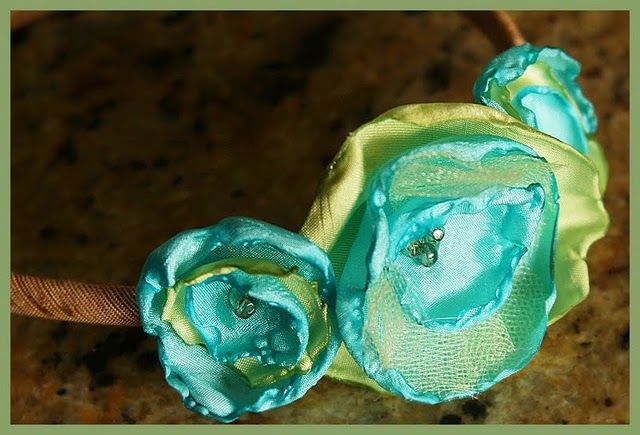
Today we are blog swapping with two darling twin sisers Kelli and Kristi!  (Oh how we wish we were twins!!)  There blog is packed full of darling DIY projects and ideas.  Check out this darling argyle wall, or these adorable headbands (really just see how they made them!).  Today they are going to share another creative project just for us!  Please share the love and visit Lolly Jane boutique!

Hi Fresh Poppy Design fans! 
We are SO excited to be guest blogging with Heather and Megan today!  Our first blog swap...yippee! 
Our names are Kelli & Kristi, we are twin sisters livin in the Valley of the Sun {AZ!} who LoVe to create! 
We have a DIY blog, Lolly Jane boutique, named after Kel's nickname growing up {Kris couldn't pronounce Kelli so called her Lolly.. Jane is also Kel's middle name}.  We show off a variety of crafts weekly and today we're going to show you how to make art from a plain ol' canvas.
After seeing this cutie~pie idea at my sis in law's house,
I realized I had a blank canvas & a random wooden "S" sitting in my Goodwill pile. {Use your coupon at Michaels, Joanns, HobbyLobby for a smokin deal to get a canvas if ya don't have one lyin around.} 
At first I thought I'd alter the sweet dreams idea for my girl's room then thought,
"Hmm..my 7 yr old is grumpy about sharing a room with her 16 month old sister and sister starts with S so let's do a sister canvas!" 
First I painted the canvas pink, my older daughter's fav color.
Then I cut a stencil from my vinyl cutter.
{You could freehand or use Word for yours if you don't have a cutter}
Next I slapped it on the canvas & painted the exposed canvas brown:
Lastly, I filled in the hearts with different shades of green just because.
And now my older kiddo can be reminded how much she'll appreciate her little sis when the gap in their age lessens.  :)
There you have it.  A sample of what we love to do on our blog: share ideas with you! 
{Best part?-cost was FREE since I had everything on hand, love that.}
Hope you had fun with us and a MAJOR thanks to Heather & Megan for letting us steal a day away from their DARLING blog! 
:)Kelli & Kristi

Thanks girls!!  That's darling artwork and it looks sooo sweet.  Sisters are the best! :)